When my flatmate tried this risotto, he said "This is perfect for a cold day like today", and you know what? He is right! Soups, risottos, stews - you name it, all perfect Wintery meals. But hey! I wouldn't mind some of this any time of the year, it's delicious! Easy to make, and so worth the 45 minutes it takes to whip it up:
Creamy Pea Risotto
(Serves 2, about 490 calories each)
1 tsp coconut- or olive oil
1 small onion, finely chopped
150g pearl barley
800ml-1L vegetable stock
Ground black pepper
100ml low-fat fromage frais, or crème fraîche (can also use quark)
130g garden peas
25g grated parmesan
Chives, fresh or dried, for garnish
- Start by boiling up your stock.
- Then in a pan, heat up the oil, and add your onion, fry for a few minutes until softened. Then, add your barley and stir so all the oil and juices have coated the barley. Now, keep the pan on medium heat and add a ladleful (about 200ml) of the stock, and stir well. Keep stirring every few minutes or so, and once it's absorbed most of the liquid, repeat until you have no stock left.
- If you've so far used 800ml stock and the texture is still a little grainy, add another ladleful of water and give it another five minutes. The feeding of the risotto should take between 30-40 minutes, but preferably closer to 40 to make sure it's lovely and creamy.
- Once you've added the last ladleful of stock or water, tip in the fromage frais or crème fraîche, sollowed by half of the parmesan and all of the peas. Stir well and leave for a couple of minutes to heat through properly before tending to it again. Season to taste and serve topped with the remaining parmesan and the chives, and enjoy!
Post snow-fall...I mean *cough* parmesan sprinkles! Might be the closest thing to snow I'll get though!
Today, I will be off to Norway for christmas and New Years, and so it might get a little quiet on my side. Who knows though, I might drop by!
I wish you a happy festive season, and a magnificent 2014!
Recipe by yours truly
- Jules
Sunday, 22 December 2013
Saturday, 21 December 2013
No Bread! Plan B(reakfast) Muffin
Ever woken up in the morning and craved bread for breakfast? Those times when cereal or porridge wont be good enough. I had one of those mornings a little while back, and I figured that there had to be some way I could get my "bread" and eat it to!
This makes one small "bread muffin"! I'd suggest making more than one once you get going though, juuuust in case you want another one. Or, you could make one that is bigger! The cheesy bits in the cottage cheese melts slightly throughout the whole thing, and I am so glad I came up with this! How many mornings have I been wanted, just a small roll or a slice of toasted bread with...something? Countless! But I prefer this to either of them, as it's freshly made.
I have tried this recipe three times now, and the most recent one was this morning! I actually swapped half a teaspoon of the cottage cheese with some tomato purée, and added a little bit of dried chives and oregano for a pizza version, and it was deeeelicious! You can pretty much adapt these breakfast muffins anyway you want - enjoy!
No Bread! Plan B(reakfast) Muffin
(Makes 1, about 130 calories)
25g wholemeal flour
Pinch of salt
Pinch of bicarbonate of soda
Pinch baking powder
2 tsp natural low-fat cottage cheese
Tomato purée, oregano and other spices optional!
- Heat a small non-stick frying pan up on medium heat as you are mixing all the ingredients for the "muffin" bread.
- Flatten it out until it is fairly flat, the size of a small tea-plate. Put it in the pan and fry a few minutes on both sides until cooked through and golden.
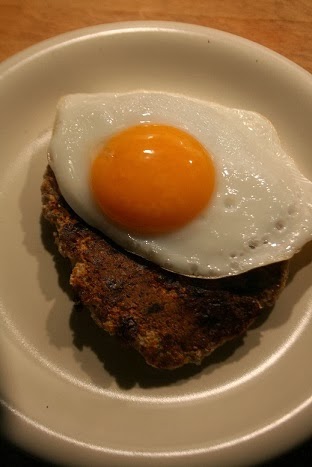
Your breakfast canvas!
Phew! Got my bread after all!
You can top with with a fried egg, soft cheese, ham, or whatever you want!
Recipe by yours truly
- Jules
This makes one small "bread muffin"! I'd suggest making more than one once you get going though, juuuust in case you want another one. Or, you could make one that is bigger! The cheesy bits in the cottage cheese melts slightly throughout the whole thing, and I am so glad I came up with this! How many mornings have I been wanted, just a small roll or a slice of toasted bread with...something? Countless! But I prefer this to either of them, as it's freshly made.
I have tried this recipe three times now, and the most recent one was this morning! I actually swapped half a teaspoon of the cottage cheese with some tomato purée, and added a little bit of dried chives and oregano for a pizza version, and it was deeeelicious! You can pretty much adapt these breakfast muffins anyway you want - enjoy!
No Bread! Plan B(reakfast) Muffin
(Makes 1, about 130 calories)
25g wholemeal flour
Pinch of salt
Pinch of bicarbonate of soda
Pinch baking powder
2 tsp natural low-fat cottage cheese
Tomato purée, oregano and other spices optional!
- Heat a small non-stick frying pan up on medium heat as you are mixing all the ingredients for the "muffin" bread.
- Flatten it out until it is fairly flat, the size of a small tea-plate. Put it in the pan and fry a few minutes on both sides until cooked through and golden.
Your breakfast canvas!
Phew! Got my bread after all!
You can top with with a fried egg, soft cheese, ham, or whatever you want!
Recipe by yours truly
- Jules
Labels:
Baking,
Breakfast,
Recipe,
Snack,
Vegetarian
Friday, 20 December 2013
Courgette, Lemon & Rice Soup
In search of another little something to make and bring with me to work. Problem was that I decided it looked so good that I had half of it for dinner! Oh well, one batch to bring in for tomorrow it still pretty good, and the soup was delicious! In flavours, it reminded me a little of the avgolemono soup that I made a little while ago, but the rosemary added made it just a little bit different. I like them both a lot, and will definitely make this again!
In this recipe, it calls for over-cooking the rice so you break down the starch more and that's what makes it extra hearty, I really like the combination of flavours and textures as well, mmmm!
Courgette, Lemon & Rice Soup
(Serves 2, about 165 calories each)
1l vegetable stock
50g uncooked rice
1 small onion (or a half), finely chopped
1 fat garlic clove, finely chopped
1/2 tsp dry rosemary, or 2 sprigs
1 courgette, washed and grated (about 200g)
Juice and peel of 1/2 lemon
Salt and black pepper to taste
- Start by boiling up water and adding the stock, rice, onion, rosemary and garlic to the pan with a little pepper (I used about 1/2 tsp whole black peppers). Cover and simmer until the rice is cooked + 10 minutes.
- Now, add your courgette and lemon zest (not the juice), and cook for a further five minutes, adding a little stock if you think the soup is too thick. Season to taste and right before serving stir through the lemon juice. And enjoy! This would go perfectly with a quick wholemeal soda bread baguette - just saying *winks*
Also, the other day, my friend Anna brought me a little present and some candied almonds! I tried some of the almonds last night, and they were heavenly! I love how they sound when clashing together with that crisp caramelised sugar on the outside. So good! And my flatmate placed a stocking randomly on the guitar stand in the living room. I thought this would make a nice christmas photo! Today is my last day before the holidays, and I cannot wait! Do you have any plans for the coming week?
Original source:
Delicious Low-Fat Recipes, p.45
- Jules
In this recipe, it calls for over-cooking the rice so you break down the starch more and that's what makes it extra hearty, I really like the combination of flavours and textures as well, mmmm!
Courgette, Lemon & Rice Soup
(Serves 2, about 165 calories each)
1l vegetable stock
50g uncooked rice
1 small onion (or a half), finely chopped
1 fat garlic clove, finely chopped
1/2 tsp dry rosemary, or 2 sprigs
1 courgette, washed and grated (about 200g)
Juice and peel of 1/2 lemon
Salt and black pepper to taste
- Start by boiling up water and adding the stock, rice, onion, rosemary and garlic to the pan with a little pepper (I used about 1/2 tsp whole black peppers). Cover and simmer until the rice is cooked + 10 minutes.
- Now, add your courgette and lemon zest (not the juice), and cook for a further five minutes, adding a little stock if you think the soup is too thick. Season to taste and right before serving stir through the lemon juice. And enjoy! This would go perfectly with a quick wholemeal soda bread baguette - just saying *winks*
Also, the other day, my friend Anna brought me a little present and some candied almonds! I tried some of the almonds last night, and they were heavenly! I love how they sound when clashing together with that crisp caramelised sugar on the outside. So good! And my flatmate placed a stocking randomly on the guitar stand in the living room. I thought this would make a nice christmas photo! Today is my last day before the holidays, and I cannot wait! Do you have any plans for the coming week?
Original source:
Delicious Low-Fat Recipes, p.45
- Jules
Thursday, 19 December 2013
Healthier Chocolate Pudding
I was looking through my granny's recipe book, and I saw all sorts of different delicious cakes and biscuits, and then I came across a few recipes for chocolate puddings. Only a few times have I ever cooked with gelatine, and when I saw that this one recipe was without - I immediately wanted to try it! Surely you couldn't make chocolate pudding and make it set without gelatine? But yes, you can!
It is less fluffy than most chocolate puddings, and therefore I decided to pour it into two cups, as I knew it was going to be quite filling, and deliciously chocolatey! This little number is vegan, and contains hardly any sugar!
Healthier Chocolate Pudding
(Serves 2, about 125 calories each)
The first time I tried it, a few hours after making it, it was a little mushy, but this is what awaited me the next day - it was great!
1 1/2 tbsp unsweetened cocoa powder
2 tbsp sukrin or xylitol
1 1/2 tbsp cornflour
1/2 - 1 tsp vanilla sugar
250ml almond milk
- Start by mixing all your dry ingredients together in a small sauce pan. Then turn the hob on medium heat and heat the mixture up, stirring occasionally until the mixture is getting hot hot hot!
- Once it's starting to thicken (this will only take a few minutes), make sure to stir frequently, letting it thicken until you have an almost thick frosting-like concistency. Hurry and pour it into two small glasses, cups or tea-cups. As you can see I put them in too big a cup! Now I know until next time! Set them in the fridge to cool overnight (preferably). Serve as it is, or with cream, chopped nuts, a bit of icing sugar on top - and enjoy!
I thought I would have to be quick to post up a healthified recipe, as for me, christmas should be good ol' fashioned cakes and dinners. This would make a great post-holiday treat *smiles*
Source of inspiration:
Mormor's cookbook
- Jules
It is less fluffy than most chocolate puddings, and therefore I decided to pour it into two cups, as I knew it was going to be quite filling, and deliciously chocolatey! This little number is vegan, and contains hardly any sugar!
Healthier Chocolate Pudding
(Serves 2, about 125 calories each)
The first time I tried it, a few hours after making it, it was a little mushy, but this is what awaited me the next day - it was great!
1 1/2 tbsp unsweetened cocoa powder
2 tbsp sukrin or xylitol
1 1/2 tbsp cornflour
1/2 - 1 tsp vanilla sugar
250ml almond milk
- Start by mixing all your dry ingredients together in a small sauce pan. Then turn the hob on medium heat and heat the mixture up, stirring occasionally until the mixture is getting hot hot hot!
- Once it's starting to thicken (this will only take a few minutes), make sure to stir frequently, letting it thicken until you have an almost thick frosting-like concistency. Hurry and pour it into two small glasses, cups or tea-cups. As you can see I put them in too big a cup! Now I know until next time! Set them in the fridge to cool overnight (preferably). Serve as it is, or with cream, chopped nuts, a bit of icing sugar on top - and enjoy!
I thought I would have to be quick to post up a healthified recipe, as for me, christmas should be good ol' fashioned cakes and dinners. This would make a great post-holiday treat *smiles*
Source of inspiration:
Mormor's cookbook
- Jules
Monday, 16 December 2013
Sandnøtter
These translates simply as sand-nuts! Like ginger nuts, except these are made with mainly potato flour for a sandy texture. I would perhaps advice you to use normal butter that is a little harder than flora, as the batter I made turned out a liiiittle melty.
Also, I was surprised at how big they turned out when shaping them with two teaspoons. You could make twice as many by using a small teaspoon's worth of batter, just note that they will bake in a few minutes less. The sand nut biscuits are not supposed to turn golden, so don't go by the colour when checking if they're done.
For many people in Norway, these are considered one of the seven kinds, but you also get some similar biscuits called sandkaker or sand-cakes! Plenty of christmas recipes out there.
Sandnøtter
(Makes 28, about 52 calories each)
125g butter (I used flora light...as always)
145g sugar
1 egg
1-2 tbsp milk of choice
210g potato flour (I bought mine in a health shop, organic shops will probably also have it)
60g plain flour
1 tsp baking powder
- Start by pre-heating your oven to 200°C.
- Now, whisk together the egg and sugar until it's light and airy, then mix in the egg and stir well.
- Sift in the flours and baking powder into the butter mixture and stir well. If using regular butter, you might get more of a dough consistency, in which case you can roll little balls, place them on a baking tray on baking parchment, and press down lightly with a fork. If the mixture is a little to wet to handle with your hands, then use two teaspoons and work it between them before placing on the baking paper.
- Place them in the middle of the oven and bake for approximately 10 minutes, tap gently with your fingers to check if they're done. Because I made mine slightly bigger, they needed about five minutes extra.
- Take out and leave on a rack to cool completely before peeling of the paper. Store in an airtight container or biscuit tin, or eat straight away with your tea of coffee!
I also noticed some other recipes for these used 1 tsp of vanilla sugar and a bit of spice like cardamom or nutmeg, so that's something to keep in mind should you feel a little experimental, you can't go wrong with vanilla sugar, mmm!
Original source:
Mormor, once again - thanks!
- Jules
Also, I was surprised at how big they turned out when shaping them with two teaspoons. You could make twice as many by using a small teaspoon's worth of batter, just note that they will bake in a few minutes less. The sand nut biscuits are not supposed to turn golden, so don't go by the colour when checking if they're done.
For many people in Norway, these are considered one of the seven kinds, but you also get some similar biscuits called sandkaker or sand-cakes! Plenty of christmas recipes out there.
Sandnøtter
(Makes 28, about 52 calories each)
125g butter (I used flora light...as always)
145g sugar
1 egg
1-2 tbsp milk of choice
210g potato flour (I bought mine in a health shop, organic shops will probably also have it)
60g plain flour
1 tsp baking powder
- Start by pre-heating your oven to 200°C.
- Now, whisk together the egg and sugar until it's light and airy, then mix in the egg and stir well.
- Sift in the flours and baking powder into the butter mixture and stir well. If using regular butter, you might get more of a dough consistency, in which case you can roll little balls, place them on a baking tray on baking parchment, and press down lightly with a fork. If the mixture is a little to wet to handle with your hands, then use two teaspoons and work it between them before placing on the baking paper.
- Place them in the middle of the oven and bake for approximately 10 minutes, tap gently with your fingers to check if they're done. Because I made mine slightly bigger, they needed about five minutes extra.
- Take out and leave on a rack to cool completely before peeling of the paper. Store in an airtight container or biscuit tin, or eat straight away with your tea of coffee!
I also noticed some other recipes for these used 1 tsp of vanilla sugar and a bit of spice like cardamom or nutmeg, so that's something to keep in mind should you feel a little experimental, you can't go wrong with vanilla sugar, mmm!
Original source:
Mormor, once again - thanks!
- Jules
Labels:
Baking,
Cookies,
Recipe,
Scandinavian,
Vegetarian
Saturday, 14 December 2013
Coco-Nutty Granola
I don't know how long I have been planning to make my own home made granola! Several recipes have been written down, but for some reason I have thought that I don't have the time for it.
So I decided something had to be done, I wanted a way to make my normal yogurt breakfast more filling, and yet more granola recipes showed themselves and I could not wait any longer!
Little did I know that it only takes about five minutes to mix together, and then for the next 40 minutes and a bit, the job basically does itself! I love nuts, and currants, and coconut! Not to mention cinnamon and citrus fruits, so I took a basic recipe and used that as my guidance for measurements, and then I made a few adjustments based on what I felt like really! Swapping some of the sweetning with a little fruit juice for a bit of zing, for example, and it turned out a treat *smiles*. I might have been stuck indoors with the cold on a Friday evening, but I managed to be productive even so!
Also, if you are needing a christmas present in a hurry, then this would make a lovely gift if put in a jar with a ribbon tied around it! Also check out Peppernøtter, Coconut Macaroons, Gingerbread biscuits, Red Onion & Fig Reduction, and Apple & Cranberry Chutney. If baking, you can leave this for a couple of days prior to christmas, the granola and preservatives will keep a little longer!
Coco-Nutty Granola
(10 servings â 40 grams, about 160 calories each)
150g oats
25g almonds, roughly chopped
25g walnuts, roughly chopped
50g unsweetened dessicated coconut
1 tbsp cinnamon
1/2 tsp salt
50g dried currants (or blueberries, cranberries etc)
2 egg whites, lightly beaten
3 tbsp honey (I used acacia)
Juice of 1 tangerine
A few tablespoons water (2-3)
- Pre-heat the oven to 150°C.
- In a small baking bowl, mix all your dry ingredients (currants included!) together.
- Whisk the egg whites and add the honey, tangerine juice and a splash of water, pour into the oat mixture and stir well.
- On a baking paper clad baking tray, pour in the mixture and pat down. Make sure it is all somewhat sticking together to make sure you get some nice clusters in there!
- Place it in the middle of the oven and bake for about 45 minutes, until crisp and golden. It might need a few more minutes, but that you can check when the time comes. I bet your flat never smelt so good!
- Cool completely, before breaking into bits, making it as clusterful as you like! Serve on top of yogurts, porridge, or with milk! Depending on how you feel, you can also add more dried fruit or chopped fresh fruits when serving too!
It looked like a work of art!
Original source:
http://rdeliciouskitchen.wordpress.com/2013/12/11/the-secret-ingredient-to-make-perfect-granola/
- Julie
So I decided something had to be done, I wanted a way to make my normal yogurt breakfast more filling, and yet more granola recipes showed themselves and I could not wait any longer!
Little did I know that it only takes about five minutes to mix together, and then for the next 40 minutes and a bit, the job basically does itself! I love nuts, and currants, and coconut! Not to mention cinnamon and citrus fruits, so I took a basic recipe and used that as my guidance for measurements, and then I made a few adjustments based on what I felt like really! Swapping some of the sweetning with a little fruit juice for a bit of zing, for example, and it turned out a treat *smiles*. I might have been stuck indoors with the cold on a Friday evening, but I managed to be productive even so!
Also, if you are needing a christmas present in a hurry, then this would make a lovely gift if put in a jar with a ribbon tied around it! Also check out Peppernøtter, Coconut Macaroons, Gingerbread biscuits, Red Onion & Fig Reduction, and Apple & Cranberry Chutney. If baking, you can leave this for a couple of days prior to christmas, the granola and preservatives will keep a little longer!
Coco-Nutty Granola
(10 servings â 40 grams, about 160 calories each)
150g oats
25g almonds, roughly chopped
25g walnuts, roughly chopped
50g unsweetened dessicated coconut
1 tbsp cinnamon
1/2 tsp salt
50g dried currants (or blueberries, cranberries etc)
2 egg whites, lightly beaten
3 tbsp honey (I used acacia)
Juice of 1 tangerine
A few tablespoons water (2-3)
- Pre-heat the oven to 150°C.
- In a small baking bowl, mix all your dry ingredients (currants included!) together.
- Whisk the egg whites and add the honey, tangerine juice and a splash of water, pour into the oat mixture and stir well.
- On a baking paper clad baking tray, pour in the mixture and pat down. Make sure it is all somewhat sticking together to make sure you get some nice clusters in there!
- Place it in the middle of the oven and bake for about 45 minutes, until crisp and golden. It might need a few more minutes, but that you can check when the time comes. I bet your flat never smelt so good!
- Cool completely, before breaking into bits, making it as clusterful as you like! Serve on top of yogurts, porridge, or with milk! Depending on how you feel, you can also add more dried fruit or chopped fresh fruits when serving too!
It looked like a work of art!
Original source:
http://rdeliciouskitchen.wordpress.com/2013/12/11/the-secret-ingredient-to-make-perfect-granola/
- Julie
Thursday, 12 December 2013
Lussekatter
In primary schools all over Scandinavia, the 13th of December is known as Santa Lucia-day. Most pupils wouldn't know the whole back story to it, and to be honest I had to look it up myself whenever I decided I was going to make Lussekatter. There are so many stories and they all sound different from one another, and so I'll just tell you what exactly I remember.
Every 13th of December, a group from one of the younger classes would dress up as little angels, or saints, and one would get to be Santa Lucia. The other children would wear lovely white little robes, and usually paperhaps they had made themselves, and hold a candle, whilst Santa Lucia would be at the very front, wearing almost like a halo-like crown, and holding a big basket full of these lovely little baked goods! They would go from classroom to classroom and make sure that everyone at the school, teachers included, would get one.
Out in the halls, the lights would be switched off, and down the hall, you could see candles, and little feet shuffling excitedly along, looking around, singing:
Svart senker natten seg
I stall og stue
Solen har gått sin vei,
Skyggene truer
Inn i vårt mørke hus
Stiger med tente lys,
Santa Lucia, Santa Lucia
Natten er mørk og stum
Med ett det suser
I alle tyste rom
Som vinger bruser
Se, på vår terskel står
Hvitkledd med lys i hår
Santa Lucia, Santa Lucia
Mørke skal flykte snart
Fra jordens daler
Slik hun et underfullt
Ord til oss taler
Dagen skal atter ny
Stige av røde sky
Santa Lucia, Santa Lucia
Lussekatter
(10 lussekatter, about 140 calories each)
50g Flora light (or light butter)
150ml semi-skimmed milk
20g fresh yeast
1g saffron (of 1/2 tsp tumeric)
50g sugar
1/2 tsp salt
2/3 tsp ground cardamom
4 dl flour, preferably all-plain (I mixed half and half wholemeal and plain, about 240g)
1 whisked egg for brushing
Raisins for decorating
- In a small pot, heat up the butter and milk until it is 37°C (body temperature, if you stick your finger into it, it should almost feel as if it isn't there). Turn off the heat and crumble in the yeast. Stir until it is all dissolved and back to liquid consistency.
- Mix all your dry ingredients in a bowl and make a well in the middle. Pour in your yeast mixture and stir well. Now knead the dough, add a little more flour or milk (1 tsp at a time, as a tiny bit makes a big difference!) should it be necessary. Place it back in the bowl and leave in a fairly warm place to rise to double its size (about 1-2 hours).
- On a floured surface, tip your dough out, and knead well. Divide the dough into about 20 bits and roll into sausages before shaping them.
- Place them on a baking clad baking tray and cover with plastic, and leave them to rise for at least a further 15 minutes, up to 45 minutes if you have the patience!
- Now, pre-heat your oven at 250°C, and brush each lussekatt with some egg, and decorate with a few raisins on each. Place the tray in the middle of the oven and bake them for about 7-10 minutes (Keep a close eye on them!) until they are nice and golden. Leave on a rack to cool, and enjoy!
Lussekatter can come in many shapes and twirls, here, you have "lussekatt" at the top left, "lily" on the top right, "christmas pig" on the bottom left, and lastly the "lily".
I know they are supposed to be more yellow in appearance, but because I used about half and half with wholemeal flour, the saffron didn't shine through as well - still as tasty though!
Original source:
http://www.tine.no/oppskrifter/sesong-og-tema/jul/julekaker/lussekatter
- Jules
Every 13th of December, a group from one of the younger classes would dress up as little angels, or saints, and one would get to be Santa Lucia. The other children would wear lovely white little robes, and usually paperhaps they had made themselves, and hold a candle, whilst Santa Lucia would be at the very front, wearing almost like a halo-like crown, and holding a big basket full of these lovely little baked goods! They would go from classroom to classroom and make sure that everyone at the school, teachers included, would get one.
Out in the halls, the lights would be switched off, and down the hall, you could see candles, and little feet shuffling excitedly along, looking around, singing:
Svart senker natten seg
I stall og stue
Solen har gått sin vei,
Skyggene truer
Inn i vårt mørke hus
Stiger med tente lys,
Santa Lucia, Santa Lucia
Natten er mørk og stum
Med ett det suser
I alle tyste rom
Som vinger bruser
Se, på vår terskel står
Hvitkledd med lys i hår
Santa Lucia, Santa Lucia
Mørke skal flykte snart
Fra jordens daler
Slik hun et underfullt
Ord til oss taler
Dagen skal atter ny
Stige av røde sky
Santa Lucia, Santa Lucia
Lussekatter
(10 lussekatter, about 140 calories each)
50g Flora light (or light butter)
150ml semi-skimmed milk
20g fresh yeast
1g saffron (of 1/2 tsp tumeric)
50g sugar
1/2 tsp salt
2/3 tsp ground cardamom
4 dl flour, preferably all-plain (I mixed half and half wholemeal and plain, about 240g)
1 whisked egg for brushing
Raisins for decorating
- In a small pot, heat up the butter and milk until it is 37°C (body temperature, if you stick your finger into it, it should almost feel as if it isn't there). Turn off the heat and crumble in the yeast. Stir until it is all dissolved and back to liquid consistency.
- Mix all your dry ingredients in a bowl and make a well in the middle. Pour in your yeast mixture and stir well. Now knead the dough, add a little more flour or milk (1 tsp at a time, as a tiny bit makes a big difference!) should it be necessary. Place it back in the bowl and leave in a fairly warm place to rise to double its size (about 1-2 hours).
- On a floured surface, tip your dough out, and knead well. Divide the dough into about 20 bits and roll into sausages before shaping them.
- Place them on a baking clad baking tray and cover with plastic, and leave them to rise for at least a further 15 minutes, up to 45 minutes if you have the patience!
- Now, pre-heat your oven at 250°C, and brush each lussekatt with some egg, and decorate with a few raisins on each. Place the tray in the middle of the oven and bake them for about 7-10 minutes (Keep a close eye on them!) until they are nice and golden. Leave on a rack to cool, and enjoy!
Lussekatter can come in many shapes and twirls, here, you have "lussekatt" at the top left, "lily" on the top right, "christmas pig" on the bottom left, and lastly the "lily".
I know they are supposed to be more yellow in appearance, but because I used about half and half with wholemeal flour, the saffron didn't shine through as well - still as tasty though!
Original source:
http://www.tine.no/oppskrifter/sesong-og-tema/jul/julekaker/lussekatter
- Jules
Labels:
Baking,
Bread,
Recipe,
Scandinavian,
Vegetarian
Subscribe to:
Posts (Atom)