Howdy! Y'all had a great week so far? I hope so!
Here, is a lovely side dish that has a little bit of a zing to it! And if you're like me and haven't completely made your mind up about what you think about mustard, worry not - as you can hardly taste it and the thyme and citrus juice takes the edge of it!
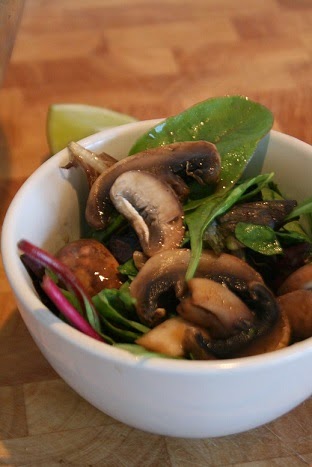
Two Mushroom Salad
(Serves 2, can be used as a side, or add a main piece of protein for a light main)
150g Chestnut mushrooms, sliced
150g button mushrooms, sliced
Salt and pepper to taste
150g mixed salad leaves (or mesclun)
Juice of 2/3 lemon or 1 lime
2 tsp mustard
1 tbsp chopped fresh thyme
- Start by frying the mushrooms in a large frying pan for about 5-10 minutes until they start sweating and start shrinking and go a dark golden colour, season with a little salt and pepper. Take off the heat and let cool for a while.
- Now, in a large mixing bowl, have the leaves and the mushrooms. Mix the citrus juice, mustard and chopped thyme and pour over the salad. Toss well to combine and serve with a main meal, such as chicken and babycorn, steak and sweet potato wedges or other such things that you think would work well paired up with this!
Today, on my lunch break, I managed to purchase a recipe book by Mister G. Ramsay, a spice and coffee bean grinder, as well as the mighty scripts of Indian cooking - India, with a thousand Indian recipes, yikes! I had a look through the book and all the dishes just makes me happy! There are some great rustic and homely photos as well as a bit of background stories about the different parts of India and their way of cooking. I cannot wait to get my paws on some of the recipes in there!
I was also told that now that I will be cooking every day at work in the near future, I am most likely to end up cooking less at home, which kind of had struck me the other week. But worry not! It only means that as opposed to posting something eeeevery day, it'll be like maybe 2-4 times a week. In other words, still regularly - so stay tuned *smiles*
What's your favourite side salad?
Original Source:
Low-Fat Meals in Minutes, p. 77
- Jules
Thursday, 31 July 2014
Tuesday, 29 July 2014
Cherry Pie Smoothie
First of all - Hello!
I hope you are having a lovely day so far, if not - why not make a cherry pie smoothie? Hell, even if you're having a good day, that is just as good enough a reason to whip up this luscious smoothie!
When I saw Katrina's "Blueberry Coconut Milk Smoothie", my first reaction was "I need this in my life!" then I realised I didn't have any blueberries at hand....The disappointment! BUT what I did have, is also a well known delicious berry-thing that works well in pies: Cherry! And so off I went first thing in the morning and had this for breakfast.
Cherry Pie Smoothie
(Serves 1)
1 cup light coconut milk, about 200-250ml
1/2 cup fresh cherries, pitted
1 small frozen banana, or 1/2 a large one
2 tbsp oats
3-4 pecans (or cashews, almonds...)
A few drops vanilla extract
A good pinch of cinnamon
A slightly smaller pinch nutmeg
Chopped pecans, granola or crumbled sweet crackers to top with
- You know how the rest goes - pop everything into a blender or use a stick blender and whizz until smooth. Pour into a tall glass (mine was too tall, so I opted for a wine glass - fancy!), and top with the sprinkle of choice. Et voilâ! And that covers two of your five a day, magic!
Aaaaalso, there was a certain mentioning of good news yesterday, was it not? Well let me tell you who handed in her resignation today!
Yours truly, as I will not be working in an office anymore, yay! I've gotten a job in one of the Street kitchens in town, so needless to say - I am pretty excited! I finish up my "old" job next Wednesday, taking a few days off, and then it'll kick off, and I cannot wait!
I hope you are all having a good week so far!
Original source:
http://warmvanillasugar.com/2014/07/09/blueberry-pie-smoothie/
- Jules
I hope you are having a lovely day so far, if not - why not make a cherry pie smoothie? Hell, even if you're having a good day, that is just as good enough a reason to whip up this luscious smoothie!
When I saw Katrina's "Blueberry Coconut Milk Smoothie", my first reaction was "I need this in my life!" then I realised I didn't have any blueberries at hand....The disappointment! BUT what I did have, is also a well known delicious berry-thing that works well in pies: Cherry! And so off I went first thing in the morning and had this for breakfast.
Cherry Pie Smoothie
(Serves 1)
1 cup light coconut milk, about 200-250ml
1/2 cup fresh cherries, pitted
1 small frozen banana, or 1/2 a large one
2 tbsp oats
3-4 pecans (or cashews, almonds...)
A few drops vanilla extract
A good pinch of cinnamon
A slightly smaller pinch nutmeg
Chopped pecans, granola or crumbled sweet crackers to top with
- You know how the rest goes - pop everything into a blender or use a stick blender and whizz until smooth. Pour into a tall glass (mine was too tall, so I opted for a wine glass - fancy!), and top with the sprinkle of choice. Et voilâ! And that covers two of your five a day, magic!
Aaaaalso, there was a certain mentioning of good news yesterday, was it not? Well let me tell you who handed in her resignation today!
Yours truly, as I will not be working in an office anymore, yay! I've gotten a job in one of the Street kitchens in town, so needless to say - I am pretty excited! I finish up my "old" job next Wednesday, taking a few days off, and then it'll kick off, and I cannot wait!
I hope you are all having a good week so far!
Original source:
http://warmvanillasugar.com/2014/07/09/blueberry-pie-smoothie/
- Jules
Monday, 28 July 2014
Sugar-Free Mango Chutney & Easy Wholemeal Chapati
Hello and merry Monday!
After a certain appointment the other week, I felt really inspired and so I thought I would make some chutney, as I hadn't since...almost two years ago! I went to the shops and got me som mangoes, and home I went cookalooking away, and this is how it turned out, a lovely fruity mix with a bit of a kick to it, but don't worry it's not too spicy.
I swapped the sugar for xylitol, and it worked a treat!
So, what to make when you have a whole lotta chutney? Well, as I am quite the novice when it comes to Indian cooking, I thought I would start with something as simple and tasty as chapati. Four ingredients all in - guess what? It worked! I got six small chapatis out of the recipe I halved, and they were really lovely with just the chutney, but I can imagine some salad would also compliment it!
Oh oh oh, and before I forget - A friend and I had a barbecue in the park last week, and we had some Mexican flavoured burgers that I used the chutney as a relish for, and it was - amazing! The Mexican spices, and beans worked a treat with the slightly spicy and sweet chutney, SO good *smiles*
Sugar Free Mango Chutney
(Makes about 2 small jars + a bit extra for testing!)
1 medium large mango
200ml vinegar
150g xylitol
2-3 cm fresh ginger, finely chopped
2 garlic cloves, finely chopped
1/2 tsp chilli powder or cayenne
2 tsp salt
1 tsp mustard seeds
50g sultanas or raisins
- In a pot, have the vinegar and xylitol, cook over low heat for about 10 minutes, stirring occasionally.
- In the meantime, prepare the mango, cut off the two sides just a little off the piy in the middle so you have two halved and the full edge with the pit. Now, s'time to make some mango hedgehogs as I like to call them. Use a knife to cut it criss-cross juuust down before you reach the mango-skin. Turn it inside out, et voila! Makes it much easier to scrape the mango off. Chop the garlic and ginger.
- Once the xylitol has dissolved and the mixture has had the chance to dissolve, add the ginger and garlic and stir for about ten minutes. Then, add the mango along with the rest of the ingredients and boil over a low heat for about 25 minutes until the chutney starts to thicken and the mango goes soft.
- Stir occasionally over that period, and if you want, you can mash the mango lightly if you want.
- Now, once the chutney is done, transfer into sterilised jars, and twist the lid on tight, this will allow for the jar to create a vacuum and seal. Stor in a cool place and eat within a few weeks, about 4-5 days once opened, but you might not even last that long! This stuff is delicious!
Have you ever tried to make chutney before?
And now for the super-simple wholemeal chapatis! (Use half white half wholemeal if you want the best of both worlds, but I prefer mines a little grainy).
Mango-hedgehog!
Mini Wholemeal Chapati
(Makes 6, serves two with a main or sides)
120-150g wholemeal flour (start with 120 first!)
100ml water
1/2 tsp salt
A tsp ghee or oil for frying
- Start by mixing the flour and salt in a medium baking bowl. Make a well in the middle and pour in the water. Work with your hand until a dough forms and add a bit of flour if it's sticky. It supposed to juuust be dry enough so it "let's go" of your hand as you're working it.
- Knead the dough on a lightly floured surfare and work it for at least 5 minutes, preferably ten. Cover and place in the fridge for about half an hour.
- Half an hour later, work the dough firmly, and then roll into a sausage. Divide it into six pieces, or four bigger ones if you want to make them slightly bigger. I had to "feed" the dough a little more flour as I went along, and I simply used a glass for rolling the chapatis out, who needs a rolling pin anyway?
- Now, heat oil in a non-stick frying pan on medium heat, once hot - add the first chapati and cook for a couple of minutes until it starts to "blister", press down with a spatula and cook on the other side until golden. Repeat with the remaining chapatis without adding more oil.
Once you've run out of chapatis to fry, guess what? S'all done! I cannot believe it's taken me this long to get around to making. I will most certainly be doing this next time chapatis are required!
From left to right: Dough divided into pieces, chapati rolle out and ready for frying, fried chapati with aforementioned chutney!
What's your favourite things to put on chapatis, or serve them with?
Today I got some good news, but I miiight just save that for tomorrow's post. I hope the new week is treating you well so far and that you have a lovely evening!
Original source:
Hamlyn All Colour Indian Cookbook, No 207 and 186
- Jules
After a certain appointment the other week, I felt really inspired and so I thought I would make some chutney, as I hadn't since...almost two years ago! I went to the shops and got me som mangoes, and home I went cookalooking away, and this is how it turned out, a lovely fruity mix with a bit of a kick to it, but don't worry it's not too spicy.
I swapped the sugar for xylitol, and it worked a treat!
So, what to make when you have a whole lotta chutney? Well, as I am quite the novice when it comes to Indian cooking, I thought I would start with something as simple and tasty as chapati. Four ingredients all in - guess what? It worked! I got six small chapatis out of the recipe I halved, and they were really lovely with just the chutney, but I can imagine some salad would also compliment it!
Oh oh oh, and before I forget - A friend and I had a barbecue in the park last week, and we had some Mexican flavoured burgers that I used the chutney as a relish for, and it was - amazing! The Mexican spices, and beans worked a treat with the slightly spicy and sweet chutney, SO good *smiles*
Sugar Free Mango Chutney
(Makes about 2 small jars + a bit extra for testing!)
1 medium large mango
200ml vinegar
150g xylitol
2-3 cm fresh ginger, finely chopped
2 garlic cloves, finely chopped
1/2 tsp chilli powder or cayenne
2 tsp salt
1 tsp mustard seeds
50g sultanas or raisins
- In a pot, have the vinegar and xylitol, cook over low heat for about 10 minutes, stirring occasionally.
- In the meantime, prepare the mango, cut off the two sides just a little off the piy in the middle so you have two halved and the full edge with the pit. Now, s'time to make some mango hedgehogs as I like to call them. Use a knife to cut it criss-cross juuust down before you reach the mango-skin. Turn it inside out, et voila! Makes it much easier to scrape the mango off. Chop the garlic and ginger.
- Once the xylitol has dissolved and the mixture has had the chance to dissolve, add the ginger and garlic and stir for about ten minutes. Then, add the mango along with the rest of the ingredients and boil over a low heat for about 25 minutes until the chutney starts to thicken and the mango goes soft.
- Stir occasionally over that period, and if you want, you can mash the mango lightly if you want.
- Now, once the chutney is done, transfer into sterilised jars, and twist the lid on tight, this will allow for the jar to create a vacuum and seal. Stor in a cool place and eat within a few weeks, about 4-5 days once opened, but you might not even last that long! This stuff is delicious!
Have you ever tried to make chutney before?
And now for the super-simple wholemeal chapatis! (Use half white half wholemeal if you want the best of both worlds, but I prefer mines a little grainy).
Mango-hedgehog!
Mini Wholemeal Chapati
(Makes 6, serves two with a main or sides)
120-150g wholemeal flour (start with 120 first!)
100ml water
1/2 tsp salt
A tsp ghee or oil for frying
- Start by mixing the flour and salt in a medium baking bowl. Make a well in the middle and pour in the water. Work with your hand until a dough forms and add a bit of flour if it's sticky. It supposed to juuust be dry enough so it "let's go" of your hand as you're working it.
- Knead the dough on a lightly floured surfare and work it for at least 5 minutes, preferably ten. Cover and place in the fridge for about half an hour.
- Half an hour later, work the dough firmly, and then roll into a sausage. Divide it into six pieces, or four bigger ones if you want to make them slightly bigger. I had to "feed" the dough a little more flour as I went along, and I simply used a glass for rolling the chapatis out, who needs a rolling pin anyway?
- Now, heat oil in a non-stick frying pan on medium heat, once hot - add the first chapati and cook for a couple of minutes until it starts to "blister", press down with a spatula and cook on the other side until golden. Repeat with the remaining chapatis without adding more oil.
Once you've run out of chapatis to fry, guess what? S'all done! I cannot believe it's taken me this long to get around to making. I will most certainly be doing this next time chapatis are required!
From left to right: Dough divided into pieces, chapati rolle out and ready for frying, fried chapati with aforementioned chutney!
What's your favourite things to put on chapatis, or serve them with?
Today I got some good news, but I miiight just save that for tomorrow's post. I hope the new week is treating you well so far and that you have a lovely evening!
Original source:
Hamlyn All Colour Indian Cookbook, No 207 and 186
- Jules
Labels:
Asian,
Baking,
Bread,
Preservatives,
Recipe,
Spreads,
Vegan,
Vegetarian
Sunday, 27 July 2014
Vegan Vanilla Cake
For the blogs 2nd bloggaversary, I thought I would invite some friends over since it was on a Saturday (aaany excuse right?), the deal being that everyone brought something home made or drinks with them in the spirit of home cooking.
Knowing that some of my friends might have dietary needs due to allergies or lifestyles, that i would try my hands on a vegan cake! I went over to June's blog, as she has been a great inspiration to me as of late, and she suggested this cake here. Which I halved as I only wanted a one-layer cake. I used xylotol in the cake mix, making the base sugar free, but I used proper icing sugar for the frosting - needs must! Also, if you want, you can make 2/3 of the frosting, as the recipe makes a little bit too much.
I decided to decorate it with berries the next morning when the frosting had set, and ta-dah! This came to life *smiles*
A delicious vanilla cake, animal friendly and all, my friends couldn't believe it was vegan - score!
Vegan Vanilla Cake
(Makes 1 cake)
170g plain flour
1/2 tbsp baking powder
Pinch of salt
60g Earth Balance or neutral vegan butter (I used sunflower)
60g coconut oil
170g xylitol or sugar
110g tofutti tofu-based cream cheese or silken tofu
1 tsp vanilla extract
120ml non-dairy milk (I used coconut)
For the frosting (makes a little too much, an excuse to make some cupcakes too?):
115g vegan butter or tofutti (I used the latter)
1/2 tbsp vanilla extract
240g/2 cups icing sugar
30ml coconut milk
Berries or vegan chocolate for decorating - perhaps chopped nuts?
- Pre-heat the oven to 180°C. Grease a cake tin or mould (about 20-24cm diameter) with either vegan butter or coconut oil, and set aside.
- In a bowl, sift in the flour, and mix it with the baking powder and salt. Stir well to combine.
- Take out another bowl and have the Earth Balance/vegan butter in with coconut oil and beat until creamy, add xylitol or sugar and keep stirring until you have a lovely slightly fluffy mixture. Now add tofu, vanilla extract, followed by the flour mixture and stir until well incorporated.
- Pour the batter into the cake tin/mould and place in the middle of the oven and bake for about 35-40 minutes until a toothpick comes out clean. Set to cool compleeetely before running a knife along the edge and tip over onto a serving plate.
- Now, for the frosting, simply whisk all the ingredients together until you have a nice, thick and slightly runny frosting. If it's too thin, add a little more icing sugar. It's supposed to be pourable, with a little help of a spoon at the end. Spread evenly out, and set to chill in the refrigerator for a couple of hours (or overnight) until the frosting has set. Decorate close to serving and tuck in!
The turnout was great! There were about 10 of us, and everyone brought something to either eat, drink, or both! And I got so many amazing recipes to try!
Gorgonzola crackers and coffee kisses
There were crackers with home-made gorgonzola garnished with walnuts and radishes, Scandinavian-style open rye bread sandwiches by my Danish homie Anna, amazing curried pears, stuffed bacon with red peppers and other such delicious things, juicy roasted onions, coffee kisses and gingered cupcakes as well as sweets, mmmm *smiles*
Love from Scandi-land!
Have you ever been to a party where everyone brings a little something? And in that case, what did you bring? I love these pot-luck set-ups as it's such a nice way to get together, catch up and enjoy some great company and food! I hope you're having a lovely weekend so far!
Original source:
http://philosophyandcake.blogspot.com/2014/07/neapolitan-celebration-cakes-part-iii.html
- Jules
Knowing that some of my friends might have dietary needs due to allergies or lifestyles, that i would try my hands on a vegan cake! I went over to June's blog, as she has been a great inspiration to me as of late, and she suggested this cake here. Which I halved as I only wanted a one-layer cake. I used xylotol in the cake mix, making the base sugar free, but I used proper icing sugar for the frosting - needs must! Also, if you want, you can make 2/3 of the frosting, as the recipe makes a little bit too much.
I decided to decorate it with berries the next morning when the frosting had set, and ta-dah! This came to life *smiles*
A delicious vanilla cake, animal friendly and all, my friends couldn't believe it was vegan - score!
Vegan Vanilla Cake
(Makes 1 cake)
170g plain flour
1/2 tbsp baking powder
Pinch of salt
60g Earth Balance or neutral vegan butter (I used sunflower)
60g coconut oil
170g xylitol or sugar
110g tofutti tofu-based cream cheese or silken tofu
1 tsp vanilla extract
120ml non-dairy milk (I used coconut)
For the frosting (makes a little too much, an excuse to make some cupcakes too?):
115g vegan butter or tofutti (I used the latter)
1/2 tbsp vanilla extract
240g/2 cups icing sugar
30ml coconut milk
Berries or vegan chocolate for decorating - perhaps chopped nuts?
- Pre-heat the oven to 180°C. Grease a cake tin or mould (about 20-24cm diameter) with either vegan butter or coconut oil, and set aside.
- In a bowl, sift in the flour, and mix it with the baking powder and salt. Stir well to combine.
- Take out another bowl and have the Earth Balance/vegan butter in with coconut oil and beat until creamy, add xylitol or sugar and keep stirring until you have a lovely slightly fluffy mixture. Now add tofu, vanilla extract, followed by the flour mixture and stir until well incorporated.
- Pour the batter into the cake tin/mould and place in the middle of the oven and bake for about 35-40 minutes until a toothpick comes out clean. Set to cool compleeetely before running a knife along the edge and tip over onto a serving plate.
- Now, for the frosting, simply whisk all the ingredients together until you have a nice, thick and slightly runny frosting. If it's too thin, add a little more icing sugar. It's supposed to be pourable, with a little help of a spoon at the end. Spread evenly out, and set to chill in the refrigerator for a couple of hours (or overnight) until the frosting has set. Decorate close to serving and tuck in!
The turnout was great! There were about 10 of us, and everyone brought something to either eat, drink, or both! And I got so many amazing recipes to try!
Gorgonzola crackers and coffee kisses
There were crackers with home-made gorgonzola garnished with walnuts and radishes, Scandinavian-style open rye bread sandwiches by my Danish homie Anna, amazing curried pears, stuffed bacon with red peppers and other such delicious things, juicy roasted onions, coffee kisses and gingered cupcakes as well as sweets, mmmm *smiles*
Love from Scandi-land!
Have you ever been to a party where everyone brings a little something? And in that case, what did you bring? I love these pot-luck set-ups as it's such a nice way to get together, catch up and enjoy some great company and food! I hope you're having a lovely weekend so far!
Original source:
http://philosophyandcake.blogspot.com/2014/07/neapolitan-celebration-cakes-part-iii.html
- Jules
Friday, 25 July 2014
Overnight Vegan "Skolebolle" Coconut Rum Oats
Thank Faramir it's Friday! And boy do I have a nice little treat to post up today!
I love coconut, and I like rum a lot - and so I thought I would rattle up a little number that would be an easy, delicious go-to breakfast or tensies.
Overnight oats is the perfect option to porridge now in the Summer heat, and using light coconut milk provides you with lots of healthy fats...not to mentioned the deliciously creamy texture the oats get overnight, so good it could almost work as a dessert, win!
The thing it, this ended up tasting a LOT like something we have in Norway called "skoleboller" or school buns, which are these lovely soft buns filled with egg custard, dipped into icing glaze and finally dipped into dessicated coconut, SO good - and it totally takes me back to my childhood ^ ^
Overnight Vegan "Skolebolle" Coconut Rum Oats
(Serves 1)
1/2 cup oats
1/3 tsp cinnamon
1 tsp xylitol or brown sugar/agave syrup
1 tsp chia seeds
A few drops of rum essence
1 cup light coconut milk
Dessicated coconut and agave syrup for topping
- In a medium-sized jar, have in all the dry ingredients. Put the lid on and give it a shake. Now add the coconut milk and rum essence, cover and shake again. Set in the refrigerator overnight.
- The next morning, add a little bit more milk if the mixture is dry, and top with whatever your heart desires, and enjoy!
PS. for those who haven't had or seen skoleboller before:
Note - this picture was taken from Google Images for reference. Tasty looking, non?
I hope you have a wonderful weekend ahead! I myself have a couple of super busy days ahead of me, and tomorrow MIGHT just be the 2nd anniversary for my blog, now how about that?!
Take care *smiles*
Recipe by yours truly,
- Jules
I love coconut, and I like rum a lot - and so I thought I would rattle up a little number that would be an easy, delicious go-to breakfast or tensies.
Overnight oats is the perfect option to porridge now in the Summer heat, and using light coconut milk provides you with lots of healthy fats...not to mentioned the deliciously creamy texture the oats get overnight, so good it could almost work as a dessert, win!
The thing it, this ended up tasting a LOT like something we have in Norway called "skoleboller" or school buns, which are these lovely soft buns filled with egg custard, dipped into icing glaze and finally dipped into dessicated coconut, SO good - and it totally takes me back to my childhood ^ ^
Overnight Vegan "Skolebolle" Coconut Rum Oats
(Serves 1)
1/2 cup oats
1/3 tsp cinnamon
1 tsp xylitol or brown sugar/agave syrup
1 tsp chia seeds
A few drops of rum essence
1 cup light coconut milk
Dessicated coconut and agave syrup for topping
- In a medium-sized jar, have in all the dry ingredients. Put the lid on and give it a shake. Now add the coconut milk and rum essence, cover and shake again. Set in the refrigerator overnight.
- The next morning, add a little bit more milk if the mixture is dry, and top with whatever your heart desires, and enjoy!
PS. for those who haven't had or seen skoleboller before:
Note - this picture was taken from Google Images for reference. Tasty looking, non?
I hope you have a wonderful weekend ahead! I myself have a couple of super busy days ahead of me, and tomorrow MIGHT just be the 2nd anniversary for my blog, now how about that?!
Take care *smiles*
Recipe by yours truly,
- Jules
Tuesday, 22 July 2014
French Vanilla Toast with Smashed Blackberries & Yogurt
Hello hello!
I wasn't going to post anything today, but then I thought - aaaaaawh why not? Plus, what better than getting a little bit of breakfast inspiration for the morning, ey?
However, I am not ashamed to say that I had this for dinner...not even one bit! This and a couple of fried sausages later, and I was one happy Julie, let me tell you!
This is the last recipe of From Season to Season for now, but I will be sure to make more use of the book, still plenty of goodies in there to try, not to mention the recipes I want to make again - which is pretty much ALL of them by the way!
French toast is the perfect comfort meal, and will always hit the spot, be it on a rainy Saturday afternoon, for breakfast, and even - as I've just proved, for dinner... This is a sweet take on it, and although it was originally served with Greek yogurt, I opted for some ricotta, but actually, I would have preferred it with just the smashed blackberries, so refreshing!
Miss Dahl suggests soaking the toast for up to 20 minutes or so, but I just left them in for a minute or so, allowing for them to absorb the delicious vanilla mixture.... Perfect for using up ricotta or yogurt, and get those frozen berries out of the freezer and on the go!
French Vanilla Toast with Smashed Blackberries & Yogurt
(Serves 1)
Note: That is not icecream, but ricotta, next time I'll make sure to have the ricotta or yogurt uuuunder the berries, or just with berries if I feel like something zingy!
2-3 slices of wolemeal or glutenfree bread (I used 3 smaller ones)
1 egg
A few drops vanilla extract
A pinch of salt
1/2 tbsp agave syrup (can use honey)
40-50ml milk
A small knob of butter for frying
A handful of blackberries (frozen works fine)
1 tsp agave syrup or honey
A splash of water
A couple of tbsp of Greek yogurt or ricotta (optional)
- First, start by mixing the egg, milk, vanilla, agave and salt in a shallow bowl. Dip in the slices of bread and let them soak for a couple of minutes, turning from time to time (if you have plenty of time, you can leave them to sit in the egg-mixture for 10-20 minutes, I was too impatient...)
- In a small pot or frying pan, have the berries, agave and a splash of water and simmer over a medium-low heat, until the berries start to fall apart and as Sophie said "split into a big jammy Autumnal mess". Turn of the heat and set aside.
- Heat the butter in a large frying pan, and have the soaked toast in. Fry for about 4 minutes on each side on medium low-heat. Once done, stack up, have the yogurt over (if using) and top with the delicious berry mixture (I did it the other way around, dang!), and enjoy!
Do you have a favourite take on the mighty French toast? I'd love to hear it!
Original source:
From Season to Season, p. 14
- Jules
I wasn't going to post anything today, but then I thought - aaaaaawh why not? Plus, what better than getting a little bit of breakfast inspiration for the morning, ey?
However, I am not ashamed to say that I had this for dinner...not even one bit! This and a couple of fried sausages later, and I was one happy Julie, let me tell you!
This is the last recipe of From Season to Season for now, but I will be sure to make more use of the book, still plenty of goodies in there to try, not to mention the recipes I want to make again - which is pretty much ALL of them by the way!
French toast is the perfect comfort meal, and will always hit the spot, be it on a rainy Saturday afternoon, for breakfast, and even - as I've just proved, for dinner... This is a sweet take on it, and although it was originally served with Greek yogurt, I opted for some ricotta, but actually, I would have preferred it with just the smashed blackberries, so refreshing!
Miss Dahl suggests soaking the toast for up to 20 minutes or so, but I just left them in for a minute or so, allowing for them to absorb the delicious vanilla mixture.... Perfect for using up ricotta or yogurt, and get those frozen berries out of the freezer and on the go!
French Vanilla Toast with Smashed Blackberries & Yogurt
(Serves 1)
Note: That is not icecream, but ricotta, next time I'll make sure to have the ricotta or yogurt uuuunder the berries, or just with berries if I feel like something zingy!
2-3 slices of wolemeal or glutenfree bread (I used 3 smaller ones)
1 egg
A few drops vanilla extract
A pinch of salt
1/2 tbsp agave syrup (can use honey)
40-50ml milk
A small knob of butter for frying
A handful of blackberries (frozen works fine)
1 tsp agave syrup or honey
A splash of water
A couple of tbsp of Greek yogurt or ricotta (optional)
- First, start by mixing the egg, milk, vanilla, agave and salt in a shallow bowl. Dip in the slices of bread and let them soak for a couple of minutes, turning from time to time (if you have plenty of time, you can leave them to sit in the egg-mixture for 10-20 minutes, I was too impatient...)
- In a small pot or frying pan, have the berries, agave and a splash of water and simmer over a medium-low heat, until the berries start to fall apart and as Sophie said "split into a big jammy Autumnal mess". Turn of the heat and set aside.
- Heat the butter in a large frying pan, and have the soaked toast in. Fry for about 4 minutes on each side on medium low-heat. Once done, stack up, have the yogurt over (if using) and top with the delicious berry mixture (I did it the other way around, dang!), and enjoy!
Do you have a favourite take on the mighty French toast? I'd love to hear it!
Original source:
From Season to Season, p. 14
- Jules
Labels:
Breakfast,
Lunch,
Recipe,
Snack,
Vegetarian
Grilled Peaches with Ricotta & Toasted Pistachios
Hey there! Yes you, why don't you come on over and keep reading, it will only take a few minutes, I promise.
And as will this lovely sweet treat that can work well as a breakfast as well as a fancy, light dessert. Perfect for a Summer evening after a big barbecue or dinner party.
I would say this dish is a mix between sweet and savoury, as the ricotta isn't particularly sweet, but that suited me juuuust fine, as the sweetness from the peach and the syrup was just enough to make it all come together nicely. Optionally instead of the ricotta, you can use a light cream cheese filling instead, using one tablespoon of soft cheese per person along with about 1 tsp or so of icing sugar - et voila! Or you could mix the agave or honey in with the ricotta/cream cheese instead, incorporating the sweet to the creamy topping.
It takes no more than 10 minutes to whip up - and that's a maximum! SHOULD you have any hints and tips on how to perfectly halve peaches, please let me know, and this one got a bit of a doing as I was trying to get to nice halves...I guess what the topping is for!
Grilled Peaches with Ricotta & Toasted Pistachios
(Serves 1, but easily multiplied for whoever many people!)
1 peach, stone and halved
about 1 tsp of (light) butter
1-2 tbsp dark runny honey or agave syrup
1 tbsp ricotta cheese (or soft cheese)
1-2 handful of shelled, unsalted pistachios
- Start by heating a griddle pan or turn up the grill on medium-hot.
- Rub the peach halved all over with the butter. And place either in the griddle pan on in the oven under the grill. Turn them after a couple of minutes if frying them, and then fry on the other side for a few minutes, or have them under the grill for five minutes, until soft and sweet.
- As the peaches are in the oven, lightly toast the pistachios.
- Once the peaches are done, top each with 1/2 tbsp ricotta cheese each and sprinkle over the toasted nuts and honey or agave, and it's ready to serve!
Original source:
From Season to Season, p. 179
- Jules
And as will this lovely sweet treat that can work well as a breakfast as well as a fancy, light dessert. Perfect for a Summer evening after a big barbecue or dinner party.
I would say this dish is a mix between sweet and savoury, as the ricotta isn't particularly sweet, but that suited me juuuust fine, as the sweetness from the peach and the syrup was just enough to make it all come together nicely. Optionally instead of the ricotta, you can use a light cream cheese filling instead, using one tablespoon of soft cheese per person along with about 1 tsp or so of icing sugar - et voila! Or you could mix the agave or honey in with the ricotta/cream cheese instead, incorporating the sweet to the creamy topping.
It takes no more than 10 minutes to whip up - and that's a maximum! SHOULD you have any hints and tips on how to perfectly halve peaches, please let me know, and this one got a bit of a doing as I was trying to get to nice halves...I guess what the topping is for!
Grilled Peaches with Ricotta & Toasted Pistachios
(Serves 1, but easily multiplied for whoever many people!)
1 peach, stone and halved
about 1 tsp of (light) butter
1-2 tbsp dark runny honey or agave syrup
1 tbsp ricotta cheese (or soft cheese)
1-2 handful of shelled, unsalted pistachios
- Start by heating a griddle pan or turn up the grill on medium-hot.
- Rub the peach halved all over with the butter. And place either in the griddle pan on in the oven under the grill. Turn them after a couple of minutes if frying them, and then fry on the other side for a few minutes, or have them under the grill for five minutes, until soft and sweet.
- As the peaches are in the oven, lightly toast the pistachios.
- Once the peaches are done, top each with 1/2 tbsp ricotta cheese each and sprinkle over the toasted nuts and honey or agave, and it's ready to serve!
Original source:
From Season to Season, p. 179
- Jules
Subscribe to:
Posts (Atom)


